How to Create a LAMP Web Server
November 13th, 2014


There are now over a billion websites on the internet. Behind the scenes of each of these websites is a server making everything work, handling requests and sending data to generate whatever page of the site you request. How exactly does the web server itself work though, and how do you make one?
In this tutorial, you'll learn how to create your very own web server capable of hosting a website that can be accessed by any computer connected to the internet. Along the way, you'll learn how each part of a web server works. Many of the points that will be covered are questions I had when starting out as a sysadmin. By the end of this tutorial, you'll not only be able to host your own website, but you'll realize that all this web administration stuff really isn't that difficult.
Contents
- The Basics
- The Host: Google Compute Engine
- The Server: Creating the VM Instance
- Connecting to the Server: Setting up SSH and FTP
- Installing the Software: I Love LAMP
- The Domain: Creating the Domain and Pointing it to our Server
- Conclusion
So, let's get into it and start with the basics.
The Basics
A web server is nothing more than a computer with certain software installed on it. In fact, you could turn the desktop or laptop you have at home into a web server if you wanted to. While you can use your own computer as a web server, the usual route is to go through a hosting company that provides the server for you (for a price, of course). There are many different hosting companies and types of servers to choose from depending on your needs. We'll be using the Google Cloud Platform, or more specifically the Google Compute Engine, which is able to handle both small and large websites.
Just like your own computer, a web server has an operating system. The majority of websites today will run on a Unix or Linux OS, using a distribution such as Debian, CentOS, or Red Hat Enterprise Linux. The Windows OS has its own web server software called Internet Information Services, or as it's usually referred to, IIS. This tutorial will focus on using the Debian Linux distro for the operating system since Linux is the most popular and all of the software used with it is stable, open source, free, and has been thoroughly tested over many years. Plus, Linux is the 'L' in LAMP.
The software you install on the OS is what actually turns the computer into a web server. The two most popular choices for Linux are Apache and Nginx. Both applications do the same thing and create a web server, the only difference is how they function - Apache creates new processes and threads for each additional connection to your server, while Nginx uses a single threaded process and an event-based architecture. This allows Nginx to handle many more concurrent connections to your server than Apache. Since Apache, though, is a bit easier, has been around for a lot longer than Nginx with more modules coded for it, and runs fine performance wise for 99% of websites, it's what we'll use for our server. Plus, it's the 'A' in LAMP. If you want to use Nginx over Apache, the principles of installing it are exactly the same, but the directory location and configuration files are different.
Once installed, the web server software continuously runs in the background and waits for incoming requests on the port(s) set in its configuration file. The default port is 80 for regular HTTP requests and 443 for HTTPS (SSL) requests. The way other computers connected to the internet contact the server is through its IP address. Just like your own computer that connects to the internet, the server has a public IP address that identifies it. When you use a domain name to visit a website, i.e. beeker.io, what's really happening is your computer is contacting your ISP (Internet Service Provider) with the domain name, your ISP then uses the domain's DNS (Domain Name Server) to find out the IP address the domain points to, and then it directs your request to that IP address. For example, here's what happens when you request http://beeker.io in your browser:
- Request http://beeker.io in browser
- HTTP detected, use port 80 default (https would be port 443)
- Resolve the beeker.io domain to the IP address it points to 130.211.117.190
- Send request to 130.211.117.190 via port 80
You can test this out by viewing this blog post using it's IP and port 80:
130.211.117.190:80/how-to-create-a-lamp-web-server
Also, you can see I don't support SSL (HTTPS) by changing the port to 443:
130.211.117.190:443/how-to-create-a-lamp-web-server
The last part of our LAMP web server, the 'M' and 'P', is MySQL and PHP.
MySQL is a relational database used to store various data. For example, if we had a blog, MySQL could be used to store all of the blog posts. The fact that it's relational just means that the data within the database is sectioned off into tables rather than stored in one big data store, and relationships can be created between tables and the data within them.
PHP is a server side scripting language that helps us make the site more dynamic. With PHP, we can manipulate the HTML of a page before it's sent off to our visitors. We can also use it to interact with MySQL database.
We'll go over each of these pieces of software and how to install them later in the tutorial. It's important to note that MySQL and PHP are NOT required to make a fully functioning web server - all you need is Linux and Apache for that! MySQL and PHP are just very common when creating web applications (your own software, blog, membership site, etc).
Sorta complicated, but not too bad, right? So, we now know that a web server is just a computer with certain software installed on it. For this tutorial, the software stack we're using is referred to as LAMP, which stands for Linux (operating system), Apache (web server application), MySQL (database), and PHP (server side scripting language). The web server software (Apache) is what actually allows the computer to function as a web server, and it does so by accepting requests and sending data over the Hyper Text Transfer Protocol (HTTP), which uses port 80 by default (and port 443 if you enable SSL). MySQL and PHP are not needed to create a working web server, but they are commonly used when developing web applications.
The Host: Google Compute Engine
The hosting company we'll use is Google. Their Cloud Platform provides a service called Compute Engine that will allow us to create the computer, or more specifically the virtual machine (VM), that will be used to create the web server. You could build your own computer or use your current one as a web server, but with that brings the additional concerns of hardware costs, scalability, loss of your internet connection, and everything else involved with keeping the server physically running and stable.
You see I mentioned the term 'virtual machine', which may be fuzzy to you. While there's hundreds of different hosting companies out there, all of them do pretty much the same thing, and offer a few basic options for servers. Here's a quick run down of each of the major server types and how they work:
- Shared Server: The most basic and and limited server type. Your data sits on the same computer and shares resources with tens, if not hundreds of other people. You're not allowed root access, and you're unable to install or modify software.
- Virtual Private Server (VPS)/Virtual Machine (VM): Basically, you get your own 'virtual' computer. Usually, the hosting company that provides this will have hundreds of servers stringed together that are strictly used for their processing power and resources, referred to as 'the cloud'. When a new virtual machine is created by a customer, a certain amount of these resources are sectioned off from the whole (the cloud or computer), and virtualization software is then used with these resources to create a mimic of a real computer. You have full root access, and can install and modify whatever software you choose.
Don't let the terms virtual private server and virtual machine confuse you. A VPS is just a VM with software on it that makes it a web server. Hosting companies usually call it a VPS since when you purchase it, it's already functioning or will be functioning as a server. - Dedicated Server: A single server that's entirely dedicated to you. This would be exactly like building your own computer and using it solely as a web server, just that this server is already built and owned by the hosting company. This is the most expensive option of the bunch.
Setting up Google Developer Console and Creating Our Project
Now that we know we'll be using a virtual machine to create the web server with Google as our host, let's get started on their platform. We'll manage everything from the Google Developer Console.
Go ahead and visit the Google Developer Console. If you don't already have a Google account, create one, and you'll be shown a page that looks like this:
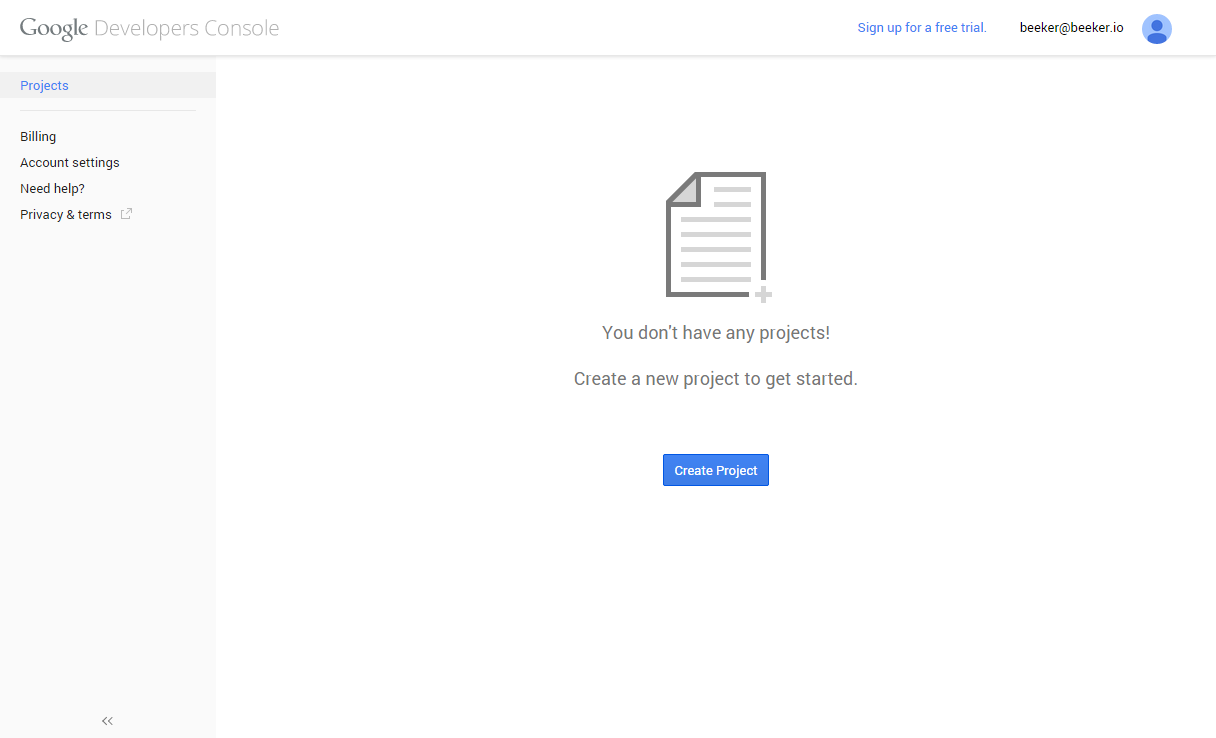
Before we can move forward, we need to set up billing so we can use services like the Compute Engine. Click on the Billing link at the top left and follow the steps to have it activated. Once it's been activated, you'll be brought back to the project overview page.
Let's create our first project. From the project overview page, click on the Create Project button. You'll be asked to provide a name and ID for your project, which can be anything you choose:
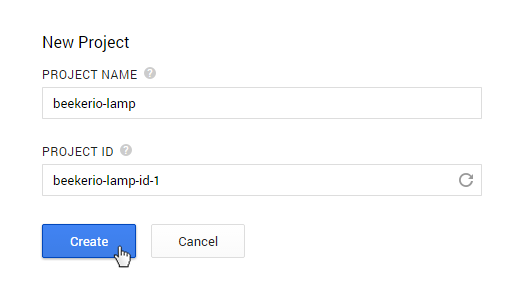
Perfect! You should now be at the dashboard of your newly created project. We're now ready to create our first virtual machine and build it into a web server.
The Server: Creating the VM Instance
Google offers an SDK called the Google Cloud SDK that provides tools and libraries which allow you to create and use services on the Google Cloud Platform. While you can install this SDK and use the tools to create the instance (VM), disk, and IP address we'll use for our server, I find it's much easier to use Google Developer Console web based platform that we're already on. Everything that you can do with the SDK tools can also be done via the web console, so that's what we'll continue to use.
Now we're going to create our virtual machine that will become our web server.
From the dashboard of your new project, click on Compute -> Compute Engine -> VM instances. You'll see the Compute Engine start initializing, and once it's completed you'll be shown a page like this:
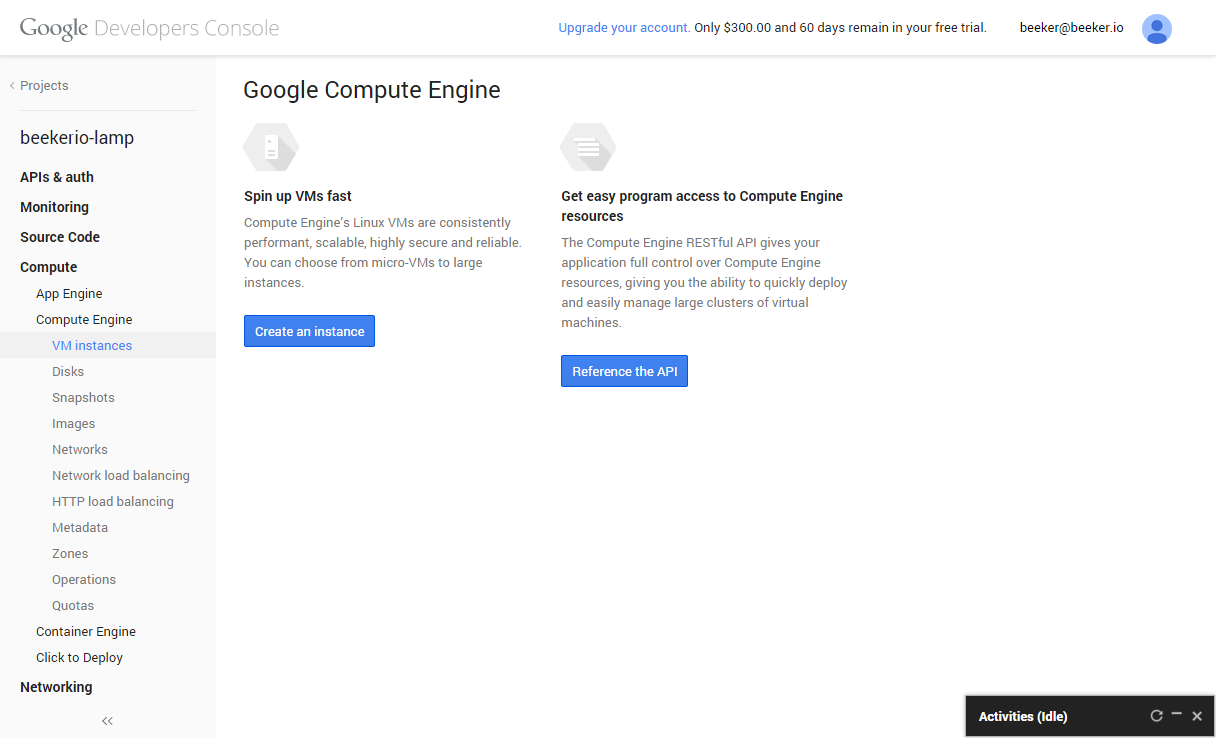
This virtual machine will be our computer. When we create it, we tell Google we want to section off a certain amount of processing power and resources from their cloud, which they use to create our virtual machine. Like a normal computer, we're going to choose how many CPUs we want, the amount of RAM, as well as the type of disk and maximum space of the disk.
Click on the Create an instance button. There's quite a few options to choose from, so I included a picture of my settings for the instance that you can copy. We'll also go over each option and explain what it's for.
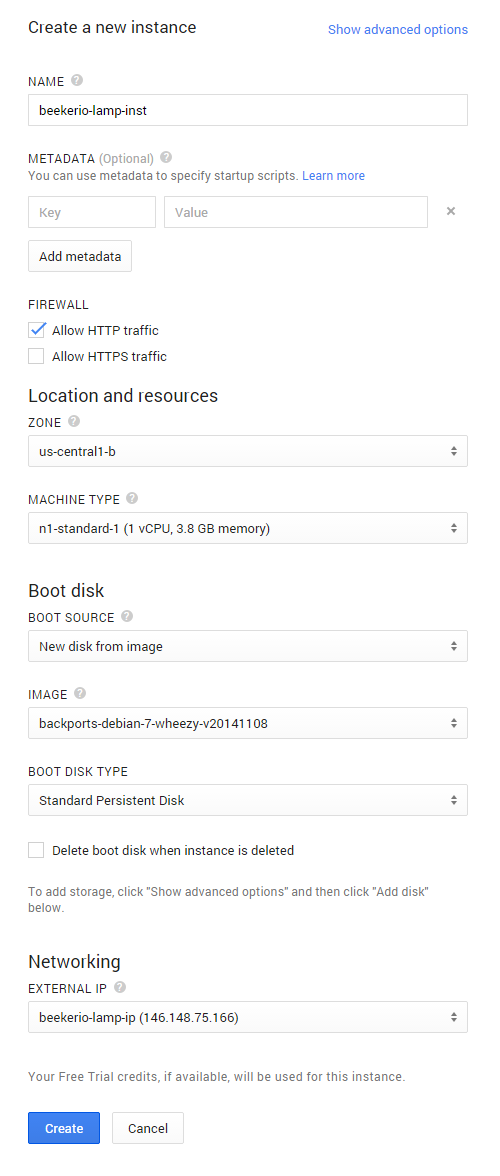
Name - The name for your instance. To keep it simple, I just use the project name with '-inst' on the end of it.
Metadata - You can add metadata that tells the instance to run a shell script upon creation. A shell script can be used to install software and create the web server automatically. Instead of using a script though, we're going to install everything by hand in the next section. No shortcuts until you understand it!
Firewall - The firewall both restricts and allows incoming traffic to our server. When our server is done being built and people visit our website, they're going to do so via port 80. If our firewall is blocking all incoming traffic from port 80, they'll never be able to connect to our server and see our website. We need to make sure we Allow HTTP traffic, which uses port 80. Since we're not going to enable SSL, we do not have to check the box for HTTPS traffic, which would just open up port 443.
Zone - Google allocates their resources in various locations across the world. You can choose any zone you wish to use resources from, but you should choose the one that will be the closest to the majority of your expected visitors.
Machine Type - How we specify the amount of resources we want for our virtual machine. We'll be using the n1-standard-1 option, which gives us 1 vCPU (virtual CPU) and 3.8 GB of RAM. This is plenty of power and memory for the vast majority of small to mid-size websites.
Boot Source - Where our boot disk will come from. Like a normal computer, our virtual machine needs a disk to boot from. This disk will store our operating system as well as the files for our website. Normally, on a production website with the Google Compute Engine, you will want to have two disks - one as the boot disk, and one as your data disk. For this tutorial and small websites, we won't need to do this and can just store our website data on the boot disk. We choose to create a New disk from image since we didn't create one prior to this instance.
Image - An image is an exact copy of all the data on a disk. Google provides us images that they created which make it easy for us to create things such as the boot disk. The image we use, backports-debian-7-wheezy, already has the Debian Linux OS installed on it for us and ready to go.
Boot Disk Type - Google offers a few choices for the type of disk we want. A Standard Persistent Disk uses regular spinning hard disks, whereas the SSD Persistent Disk uses flash memory and allows a much higher read and write throughput. Since they are 'persistent', this means they will survive past the life of any instance you create. A cool feature of the Google Cloud Platform is that you can detach and reattach a disk to any instance you want, as long as it's the same zone, and even have a single disk attached to multiple instances in read access only. The last option is Ephemeral which creates a temporary disk, which we don't want.
Delete boot disk when instance is deleted - When this option is enabled, the boot disk attached to the instance will be deleted if the instance is deleted. Since we're keeping our website data on the boot disk, we want to uncheck this option.
External IP - In order for our server to be publicly accessible on the internet, we need to give it an IP address that will identify it. We do so by choosing the New static IP address... option. We'll be asked to create a new IP by giving it a name, in this case I used beekerio-lamp-ip. Now we'll be able to use this IP address to connect to our server, and later on we'll point our domain to it!
Phew! Now that we have all of our settings in place for our instance, let's create it by clicking Create.
While Google does it's thing to build our VM instance, take a step back and revel in the fact that soon you will be running a real, live web server, hosted on the Google infrastructure no less! Pretty cool. The instance should now be created and you should see a page like this:
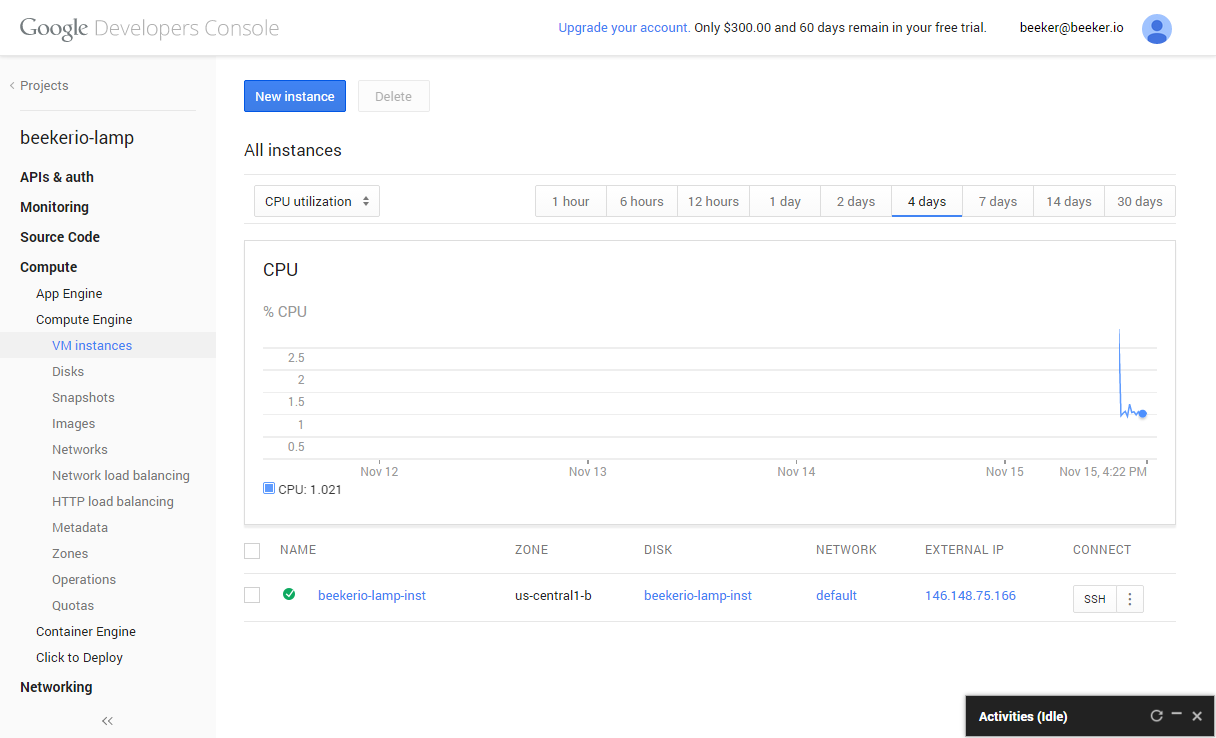
Our brand new VM is now active, but it's just an operating system at the moment. We only have the 'L' in our LAMP web server. Soon, we will install the software required to make it a full LAMP server, but first we need to be able to connect to it.
Connecting to the Server: Setting up SSH and FTP
To install the software we need on our VM, and upload our website files to it, we use two protocols. The first protocol is SSH (Secure Shell), which let's us login to our VM and issue commands to it via a shell (just like a Linux shell). The second protocol is FTP (File Transfer Protocol), which we'll use to upload and manage the files for our website.
When connecting to our server via SSH or FTP, we have to use a public/private SSH key pair to identify us rather than a standard username and password. This is how Google has it set up to work, and it in fact provides a greater level of security.
A few applications will help us do what we need. We're going to first generate a the SSH key pair using PuTTYgen. We'll then add the public key to our VM instance on Google and save our private key as a file. After that, we'll set up our SSH client, PuTTY, and FTP client, FileZilla, to use our private SSH key file to connect to our VM. Don't worry, it sounds complicated but is actually a very simple process.
Download PuTTYgen, PuTTY, and FileZilla
For this tutorial, I'm assuming you're using Windows to connect to your VM. If you use a Mac or another form of Linux, have no fear, because these applications are available for Linux as well.
Download and install the following applications on your computer:
- PuTTYgen (puttygen.exe) - Generates our public/private SSH key pair
- PuTTY (putty.exe) - The SSH client we use to issue commands to our VM
- FileZilla - The FTP client we use to manage our website files
Generate our public/private SSH keys using PuTTYgen
Let's run puttygen.exe. We'll be presented with this window:
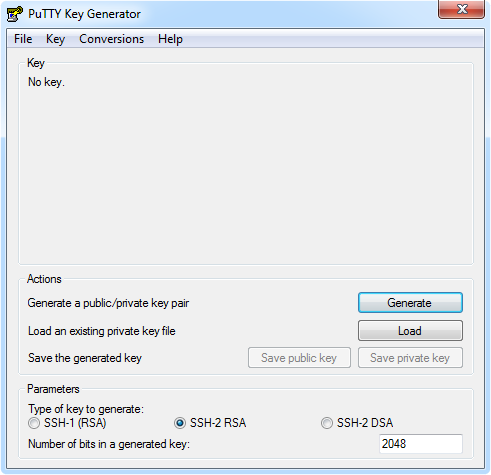
There are two options we need to pay attention to. The Type of key to generate and the Number of bits in a generated key.
Type of key to generate - The current version of SSH is 2.0. Security vulnerabilities were discovered in the SSH 1.x versions, so hosting companies today use the current 2.0 version. We choose to use SSH-2 RSA over SSH-2 DSA. RSA and DSA signify the different algorithms used to produce the key. There's some debate over which is faster, but in the end it doesn't really matter and RSA is generally used.
Number of bits in a generated key - Basically, how strong the encryption of our keys will be. We could use 4096 bits over 2048 for even stronger encryption, but 2048 is the common standard and more than enough protection for regular websites.
With these settings in place, we can go ahead and click the Generate button. You'll be asked to move your mouse around the 'Key' window to produce random data, and then your key will be created.
You should now see your public key which starts with 'ssh-rsa' in a large text box up top. Below that, you'll see your Key fingerprint, Key comment, and Key passphrase. Now, we'll need to change the Key comment field so it contains your Google Developer Console email address. However, we also have to replace the '@' and '.' characters within the email to underscores. On our VM, our username is the underscored version of our email address, and our key comment has to match it in order for us to be verified.
For example, my email is beeker@beeker.io, so I need to enter beeker_beeker_io in the Key comment field. It should now look like this:
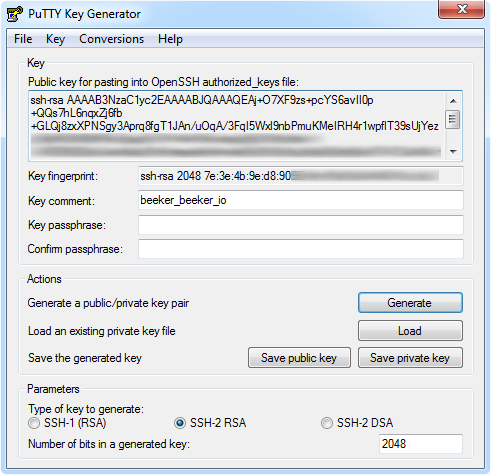
Since FileZilla does not currently support password protected key files, we can leave the Key passphrase field blank. With it blank, we will only be asked for our username when logging in rather than our username and key passphrase.
Both our public and private SSH keys are now generated and ready to be used!
First, click on the Save private key button to save the private key. Remember where you save it because we'll need to use it later when logging in our with SSH and FTP clients.
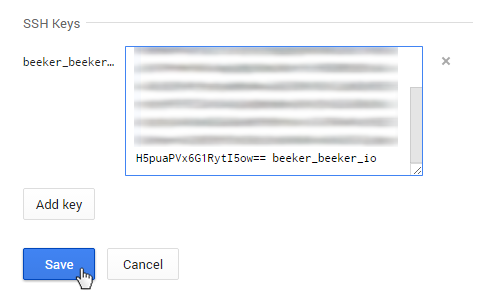
Next, highlight and copy your entire public key from the top text box. In your browser, go to the overview for your instance on the Google Developer Console, and scroll down to find the SSH Keys section. Click on Add SSH Key, paste your public key in the input shown, and click Save.
That's it! Now, when we go to use our SSH and FTP clients, we can use our private key file with them which will be matched against our public key and allow us to login.
Connect via SSH using PuTTY
PuTTY is our SSH client. It let's us login to our server via the SSH protocol, and once logged in we're given a shell on our VM that allows us to issue commands to it. With this shell, we have full control over our VM. This is just like a normal Linux shell if you're familiar with one, and is similar to the Command Prompt program in Windows.
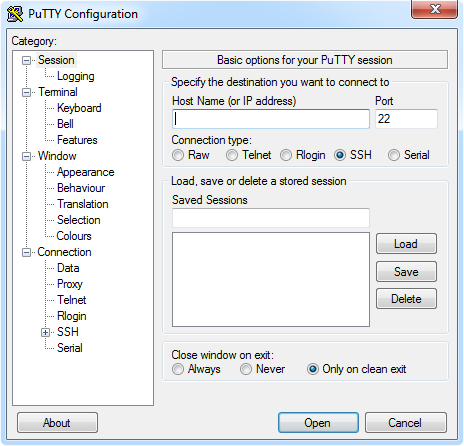
Let's run the putty.exe program:
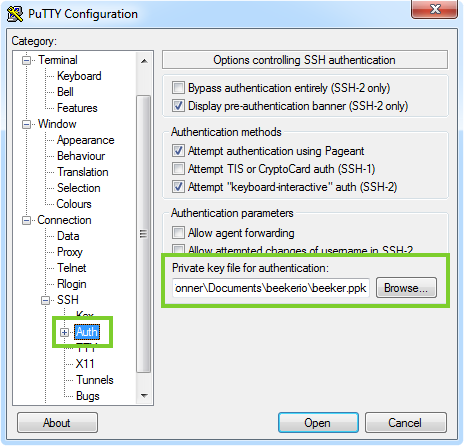
The first thing we need to do is add our private key file that will be used when connecting to our VM. Under the Category list on the left, click on Connection -> SSH -> Auth. At the bottom of the Authentication parameters section, you'll see the Private key file for authentication option. Remember how we saved the private SSH key in PuTTYgen? This is where we use it.
Click the Browse... button under the Private key file for authentication option and select your private key (.ppk) file:
Now we'll actually connect to our VM.
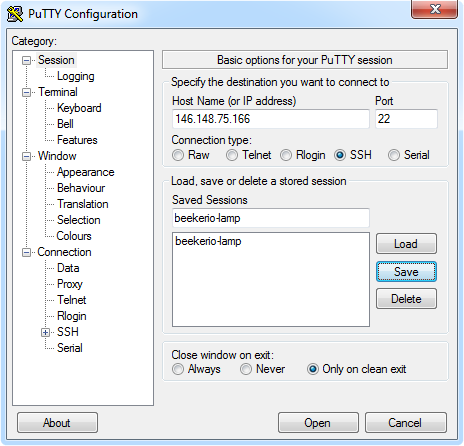
Go back to the Session category. In the Host Name (or IP address) field, enter in the IP address of your instance. This can be found on the overview for your instance in the Google Developer Console. Make sure SSH is selected for the Connection type option.
We could connect now, but let's save these settings so we don't have to redo it all next time. Under the Load, save or delete a stored session section, give this session a name by entering it into the input box right under Saved Sessions, then click the Save button.
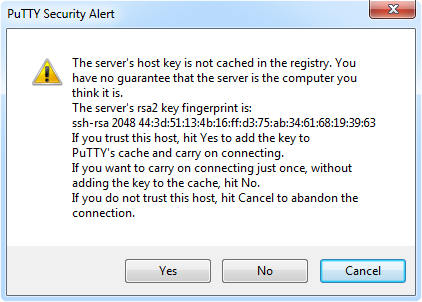
And now, the moment of truth. Go ahead and click on the Open button to connect to your VM. You may get a warning as shown below on your first connection. If you do, just click Yes to acknowledge that you trust the host (our VM):
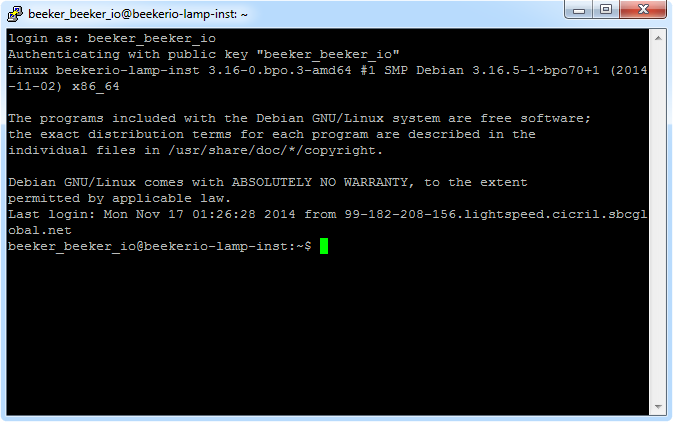
The PuTTY terminal window will now pop up, and you will be asked to enter in your username. Remember, use the underscored version of your email that's tied to your Google Developer Console account. For me, I would use beeker_beeker_io. Type it in and press enter, and you should be logged into your VM.
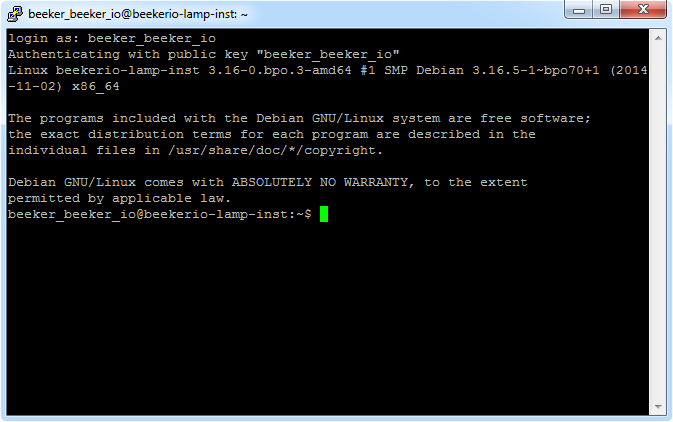
Success! From here, we'll be able to install the Apache web server and other software needed to make this VM a LAMP server. Before we do that though, let's get the FTP client set up so it'll be easy for us to upload files to the server.
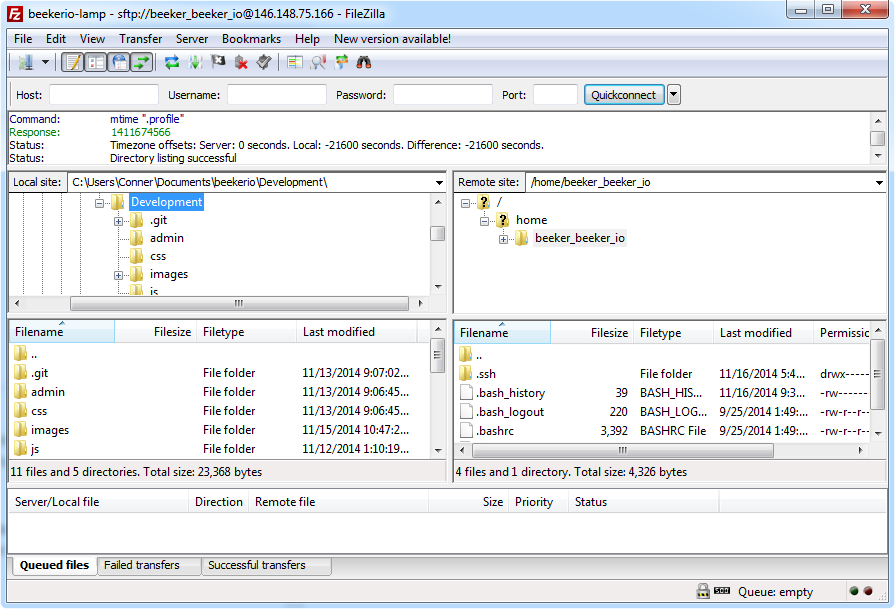
Connect via FTP using FileZilla
While we won't be uploading any website files right now (or in the rest of this tutorial for that matter since we're just making the server), the FTP client is an important tool to have for when you're ready to do so. We're going to set up our connection on FileZilla and save it so we can use it later.
Let's open up the FileZilla program
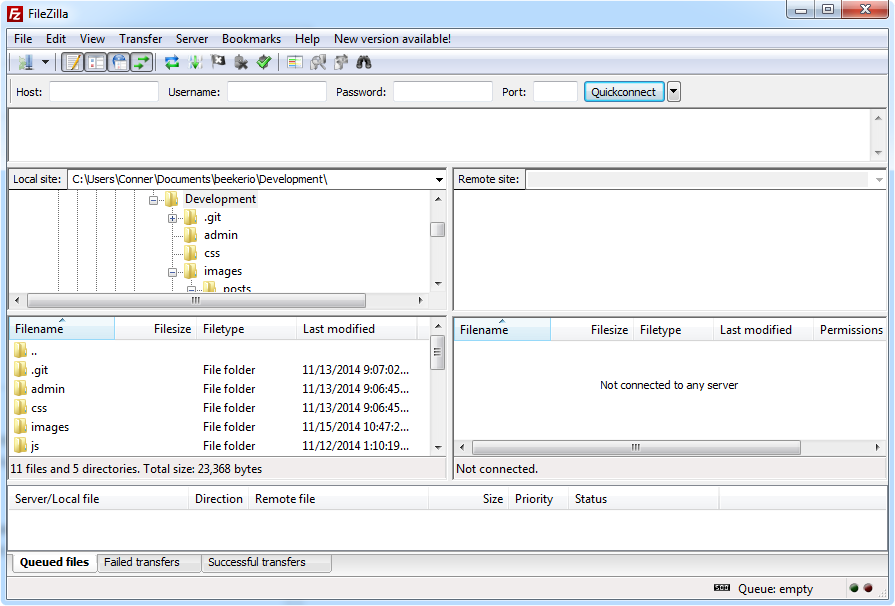
Just as we did with PuTTY, we're going to add our private key file to FileZilla. Click on Edit -> Settings... to be brought to the settings window. Under the Select page section on the left, choose the Connection -> SFTP option. This is where FileZilla will let us locate and add our private key.
Click on the Add key file... button and select your private key (.ppk) file, just as we did before with PuTTY.
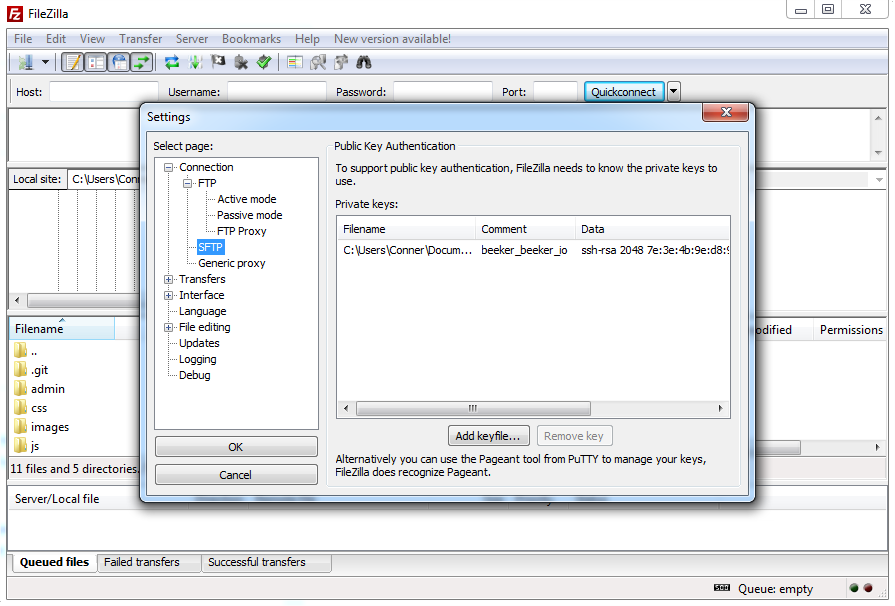
Our private key is now ready to be used with FileZilla. Let's click on OK to exit out of the settings dialog.
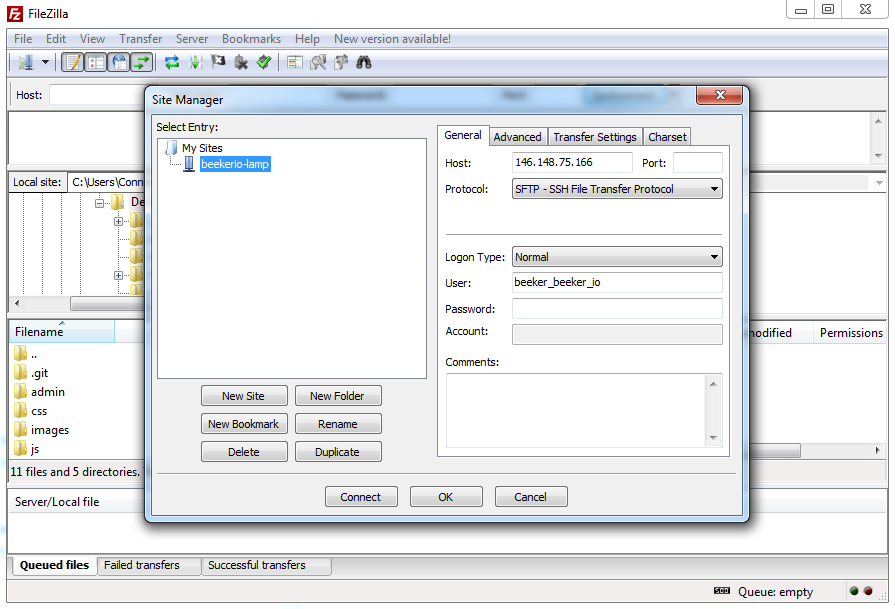
Now, let's set up our connection. Click on File -> Site Manager... From here, we can enter in our VM info and save it so it's easier to connect each time.
First, click on the New Site button and give it a name. I used my project name, beekerio-lamp. Next, on the right side under the General tab, enter in the IP address for your instance under Host and choose SFTP - SSH File Transfer Protocol as the Protocol. For Logon Type, choose Normal, then enter in your underscored email for the User while leaving the Password field blank. Here's how my settings look:
Let's do a quick test connect, just to make sure we have everything set up correctly. Click on the Connect button and you should logged in, with your user's home directory as the landing point.
Congratulations! It's a lot of work, but both SSH and FTP are easily the most crucial things to have working on your server. When you're running a real website, you'll be using both of them constantly; SSH to manage the server itself, and FTP to manage your website files on the server.
Installing the Software: I Love LAMP
We're finally ready to install the software that will make our VM a true LAMP server. We already have Linux as the operating system, so we're just going to have to install Apache (the web server), MySQL (the database), and PHP (the server side scripting language).
This is where PuTTY and SSH comes in. Through our shell, we'll be able to send all the commands needed to perform the installs, as well as modify any configuration files we need to.
Open up PuTTY and load the session we saved earlier, then click Open to connect. You'll again be prompted for your username, which will be your underscored Google Developer Console email address.
Now, we should be back on our shell in PuTTY:
Get root
We need to be the root user when installing the software, and currently we're logged in as a normal user. We could run each command prefixed with sudo (SUperuser DO) to execute it as the root user, but this will become a hassle. Let's start a new shell as root by using this command:
sudo -sUpdate Packages
Everything will be installed via packages using the apt-get command, which uses the APT library. Let's get an updated list of all the available packages by running the apt-get update command.
apt-get updateInstall VIM
This isn't required, but I prefer to use the VIM text editor over vi or nano. I'll be going over the basic commands used to edit and save files using VIM, but you can also check out this guide if you want to learn more about it and how to use it.
Let's install VIM with apt-get, and then we'll use it to modify it's own configuration files to enable syntax highlighting.
apt-get install vimYou'll be asked to confirm that you want to install. Type in a capital Y followed by enter to confirm. You'll see VIM then start downloading and installing the required packages and dependencies. Now that it's installed, let's enable its syntax highlighting feature by modifying the configuration file.
Open up the VIM configuration file.
vim /etc/vim/vimrcArrow down a bit and you'll see this section:
" Vim5 and later versions support syntax highlighting. Uncommenting the next
" line enables syntax highlighting by default.
"syntax on

" If using a dark background within the editing area and syntax highlighting
" turn on this option as well
"set background=dark
To enable the syntax highlighting, we just have to remove the double quote (") comment symbol in front of 'syntax on' and 'set background=dark'. Press i to enter into insert mode in VIM, then delete the double quote in front of each one so it looks like this:
" Vim5 and later versions support syntax highlighting. Uncommenting the next
" line enables syntax highlighting by default.
syntax on

" If using a dark background within the editing area and syntax highlighting
" turn on this option as well
set background=dark
Now press ESC to enter back into the command mode of VIM, then press :wq and Enter to save the changes. Done, we'll now see the syntax of certain files (like configuration files) highlighted when viewing them. This makes it much easier to read and make the changes we need.
Install Apache
Apache is the actual web server. Once installed, it will automatically start running in the background using its default configuration file. We'll be able to visit the IP address of our VM in our browser, and see the first web page of our server!
Let's get right to it and install Apache.
apt-get install apache2Finally, after this long journey, we have a live, fully functioning web server. You can now visit your server (no longer just a VM!) by typing its IP address into your browser, as you would a normal web page. When it loads, you should be shown the default Apache welcome page.
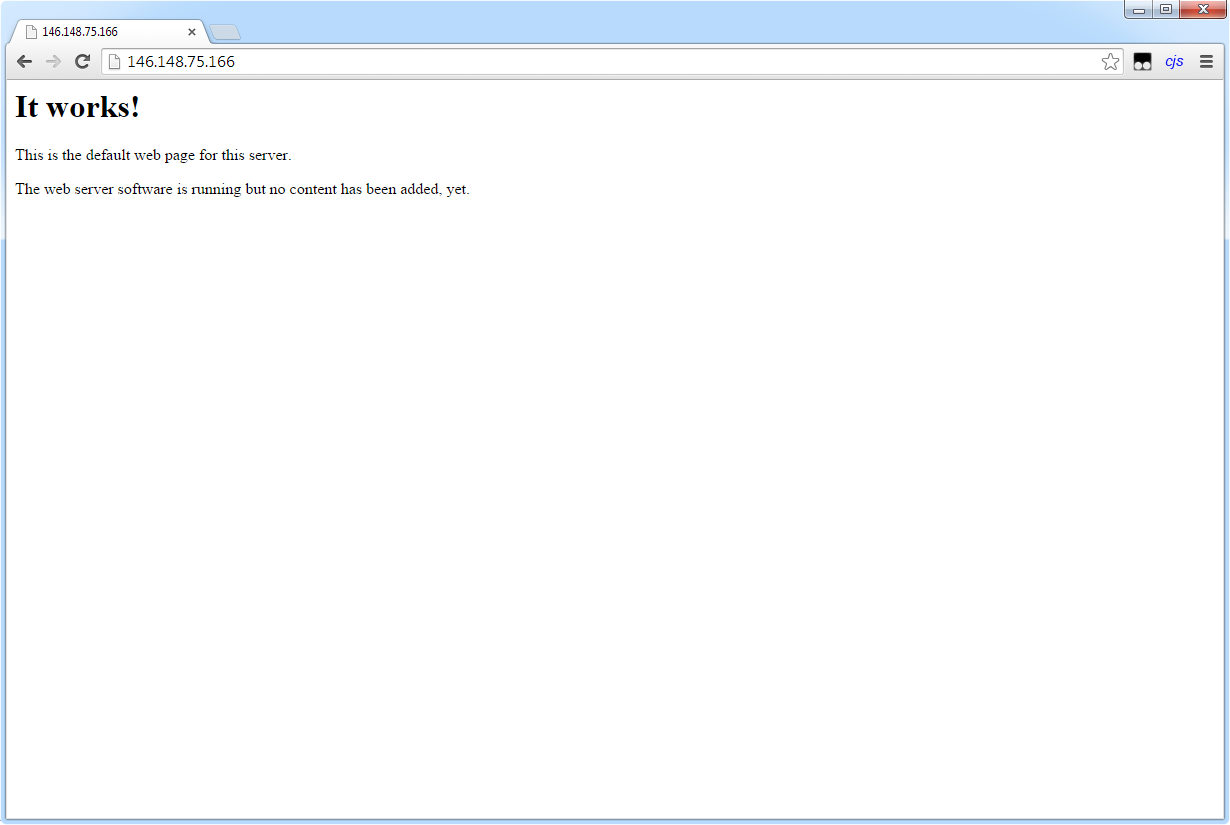
Now THAT is awesome. We created a server, from scratch, that can be reached via the internet from all over the world. I almost feel like some epic music from Hans Zimmer should start playing.
A very common module to enable on Apache is mod_rewrite. With it, you'll be able to 'rewrite', or modify, requested URLs on the fly. Let's enable it so we have it ready for future use.
a2enmod rewritea2enmod is an application from Apache that actually enables modules for us. In this case, we tell it to enable the rewrite module.
Let's restart Apache so the changes take effect.
service apache2 restartDone!
Install MySQL
MySQL will be the database for our server. It allows us to easily store and access data we may need for our site. For instance, let's say we run a blog. While we could store each post as it's own separate HTML page and upload that to the server, that would be counter-intuitive. Instead, we can create a template in PHP and store all of our blog posts in MySQL, and when someone requests a certain post, we pull its data and display it with our template. Instead of having possibly hundreds of different files for each post, we just have the single PHP file that can dynamically pull any post we tell it to. This is just one example, too.
Installing MySQL is just as easy as installing Apache, however you'll be asked to create a password for the root MySQL user during the installation:
apt-get install mysql-serverNow that it's installed, let's make MySQL a bit more secure since the default installation leaves some security holes open such as a test user account. Run this command in your terminal:
mysql_secure_installationThen you can just follow the guide, answering yes or no to the questions asked.
Install PHP
Now, for the final part of our LAMP server, PHP. PHP is a server side scripting language that allows you to manipulate pages and data before it's sent off to your visitors. In the same blog example we used for MySQL, PHP would function to pull the data from our database and display it how we want to the end user. PHP is by far the most popular web scripting language out there.
If you thought PHP was going to be any harder to install than Apache or MySQL, I'm sorry to disappoint! Let's install it with this command:
apt-get install php5 php-pear php5-mysqlAnd restart Apache for the changes to take effect:
service apache2 restartYou can see we added a few extra packages to be installed alongside php5. php-pear is the PHP PHP Extension and Application Repository, which functions much like the APT library and let's us install various modules for PHP. php5-mysql is a package for PHP containing the modules we need to connect to our MySQL database and use it directly from our PHP scripts.
One more module we'll install for PHP is the cURL module. This is another popular feature which allows you to make HTTP requests from within PHP scripts.
apt-get install php5-curlAnd restart Apache once more.
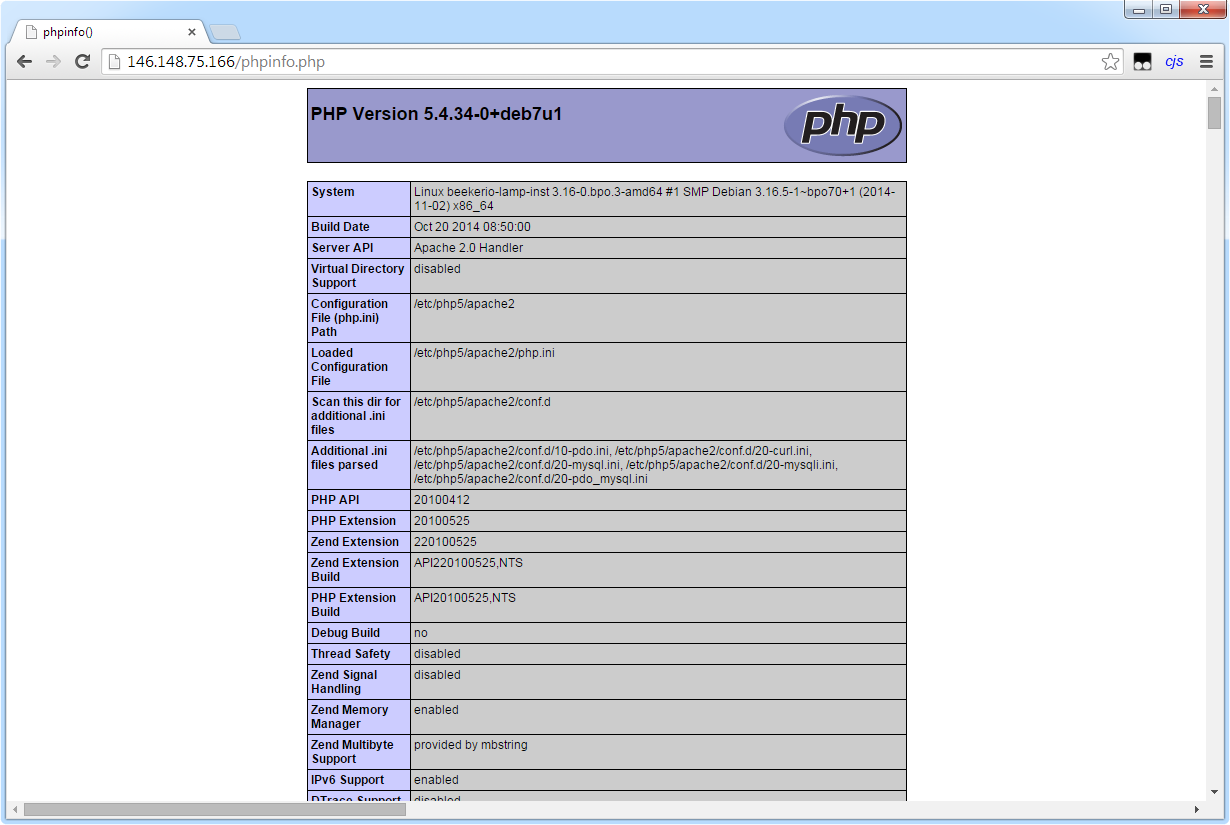
service apache2 restartLet's do a quick test to confirm PHP is installed and running with Apache. Type this in your terminal:
echo "<?php phpinfo(); ?>" > /var/www/phpinfo.phpWith this command, we're echoing a small PHP script (the text between the double quotes) to the standard output of our shell. The PHP function that we're calling in this script, phpinfo(), just outputs various information about our server. We use the > symbol to tell the shell that we're redirecting the standard output to a new phpinfo.php file, which is to be created in our public web directory that Apache made for us, /var/www.
In your browser, type in your server's IP address followed by '/phpinfo.php'. For example, for my server in this tutorial I need to visit http://146.148.75.166/phpinfo.php. If we did everything correctly, you should see the PHP info page:
Now that we have all of our software installed and our server is running correctly, let's get a domain for it so it's much easier to find and access on the web.
The Domain: Creating the Domain and Pointing it to our Server
Our server is online and accessible, but at the moment we can only reach it by using its IP address. If we're building a legitimate website, it needs a domain name.
A domain name is basically a pointer to an IP address. Every domain has a DNS record, or zone file as it's also called, with a basic set of instructions for resolving the domain into an IP address. There are instructions for handling the root domain request, subdomain requests, mail, and more.
Once we purchase a domain through a registrar, we'll be allowed to edit the DNS record for it. In this DNS record, we need to modify the A record, or address record, which is an instruction that returns an IP address. For it point to our server, we just have the instruction use the IP address of our server. It's standard that there should only be one A record per IP address specified.
Then, we'll also add in a CNAME record, or canonical record, so we can handle a possible 'www' in front of our domain. When you see 'www' in front of a domain, i.e. www.beeker.io intead of beeker.io, the 'www' is actually referring to a subdomain of beeker.io. Since it's standard to have this subdomain, we'll add a record to handle it which just says point any www subdomain to our main domain, which then goes to our main IP address. In this sense, www.beeker.io and beeker.io point to the exact same IP address and server.
Purchasing a Domain
There are a ton of registrars you can choose from. Namecheap, GoDaddy, and Network Solutions are a few popular options. The registrar you choose won't really make a difference, but for this tutorial we'll be using Namecheap.
Purchasing the domain is actually really straight forward. If you've ever ordered anything through Amazon, you'll be able to buy a domain. If you haven't, don't worry because it's very easy.
Visit Namecheap and you'll see their homepage where you can search for a domain name.
You can enter in any domain name you wish. I chose beeker.io, and after searching and seeing it was available, I added it to my cart and checked out. You'll create an account with Namecheap and be asked basic information such as your name, address, and billing details. You'll also be asked how long you want to purchase the domain name for. Every domain has a certain expiry date where if you don't renew it by that date, you will lose ownership and anyone out there can purchase it and take it over.
Once your domain has been purchased, you can log back into Namecheap. In the upper right corner, click on Menu -> Manage Domains. Find your newly purchased domain and click on it. On the left hand side, click on the link for All Host Records. You should now be brought to the DNS record management page for you domain, which looks like this:
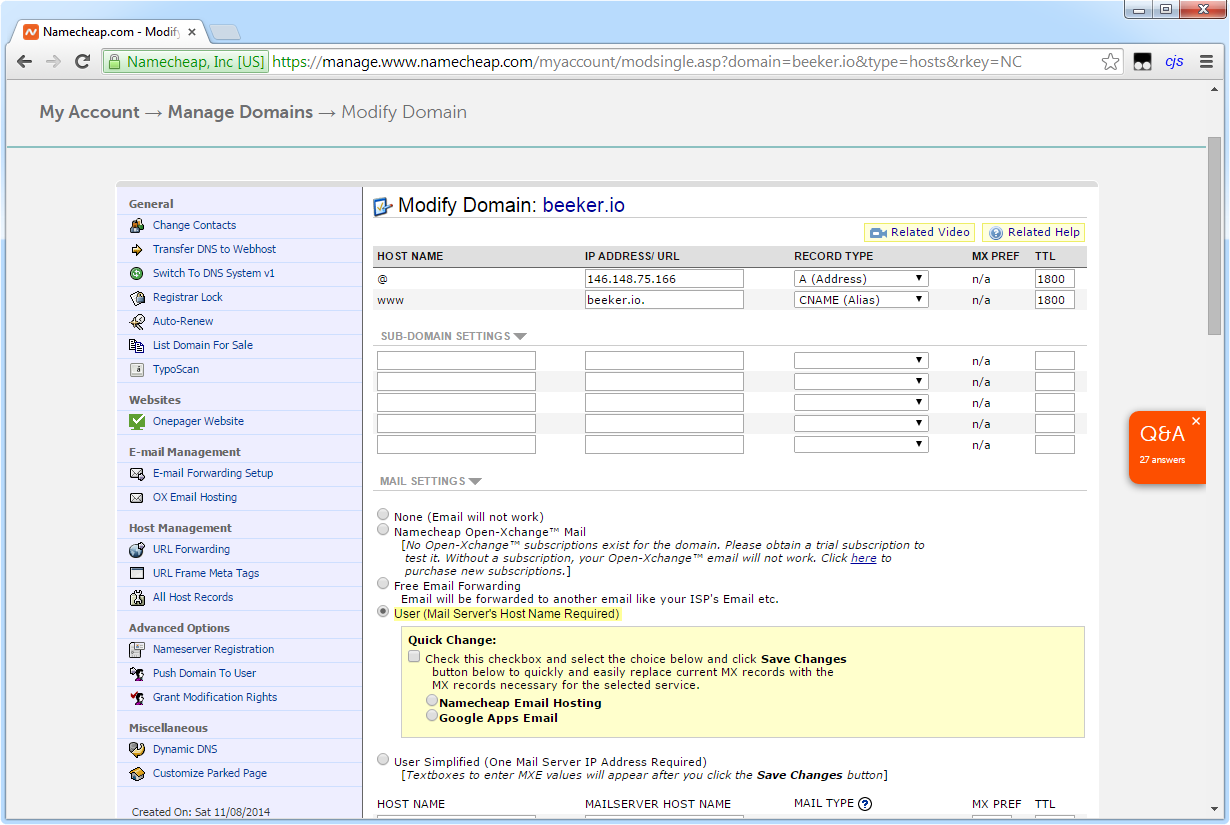
You can see I already filled in the information for my server. Let's go over it to see exactly what it's doing.
The first record is our A record. The @ symbol signifies that this is for the 'Primary', or in other words, our root domain (beeker.io in my case). Next, we provide the IP address of the server we created, followed by the record type and the TTL value. TTL stands for 'Time To Live' and signifies the lifespan of our record information, in seconds, before it must be checked again for any updates.
The next and final record is a CNAME record for the www subdomain. We're simply telling it to direct all requests for the www subdomain to our main domain. Since we're using our fully qualified domain name for the entry, we must enter our domain name followed by a period to signify that it is a domain name we're using and not a reference name. You can see I entered in beeker.io. for my www CNAME entry.
Once you've entered in both of these records, scroll to the bottom and click on Save Changes. We're all done! But wait, if you try going to your domain right away, it may not show up. This is because of our TTL values and something called propagation. Our new DNS record needs to be updated across all the different ISPs in the world. In the United States, this update usually happens within minutes, but in some countries it can take up to a week or so.
Continually check your domain every few minutes, and once it has propagated, you should see the previous Apache welcome page we saw earlier. This time, though, we're using our domain and not the IP address!
Conclusion
I hope this tutorial helps you realize how easy it is nowadays to host your own website. The principles learned here should also aid you in many other things. What if you want to install NodeJS? Well, it's the same thing, you'd just install NodeJS instead of Apache, or you can even run it alongside Apache or Nginx as a proxy. You are now the sysadmin of your own server, and the options are up to you.
Be sure to comment below!
Comments
Thank you so much for your hard work.
you rock..
im in go daddy and got lost...
Push on maybe ill figure it out... cheers, Kai